Variant Financial Popup Credit App for WordPress – Installation Guide
Step 1 – Install the plugin into your WordPress site
Your Variant representative will email you the most resent version of the popup credit app program. Install the zip file into your WordPress site and activate the plugin.

Step 2 – Set the base settings from the Popup Credit App settings menu
After activating the plugin, you will find a new menu item in your WordPress dashboard labeled Popup Credit App. Select this option from the dashboard to access the settings menu.
In the field labeled Remote Site URL, place the url https://variantfinancial.com/ in the box.
In the field labeled Merchant ID, place your 3 or 4 digit merchant ID that was given to you upon your dealer approval.

Step 3 – Set the Hover Application Button to your desired settings.
Change multiple settings for the hover button including placement (right/left/top/bottum), border thickness, and positioning.

Step 4 – Place application buttons anywhere on your WordPress site.
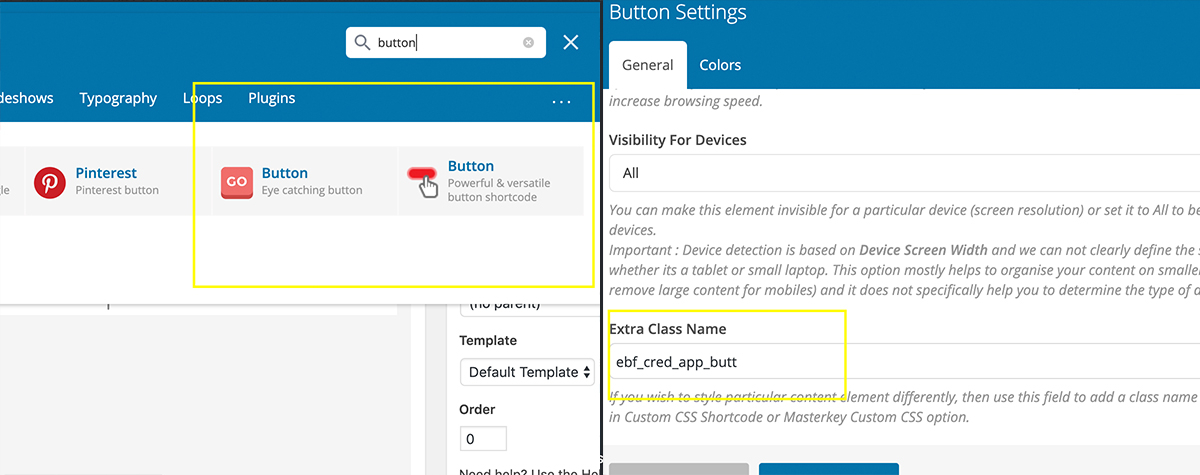
*IMPORTANT NOTE – The example provided here is done with WP Bakery Visual Composer as the WordPress page editor. Other editors such as Beaver, SiteOrigin, Unyson, etc, may label the field for Button Class Name differently than EXTRA CLASS NAME as it is labeled in Visual Composer. The code you will place in the box will not change ebf_cred_app_butt.
The Popup Credit App plugin allows you to place buttons anywhere on your website with the shortcode ebf_cred_app_butt placed in the Extra Class Name field in your button settings (located at the bottom of the settings menu).
